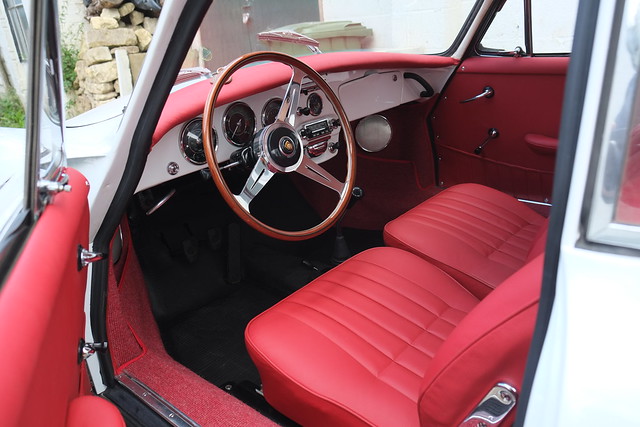
Hello, KCT is back home and we are absolutely delighted with the paint job, the care Ranj at Riverside Garage took in following the incredibly detailed 'what finish went where' sheet I got from James Davies was superb. The representatives from DuPont, the paint suppliers, also got heavily involved as it was of great interest to them, something away from the normal run of the mill modern Merc/BMW/Bentley etc. Ranj even let me use his lift to put in the wiring loom, and a few other bits, this made these jobs soooo much easier than rolling around the floor, and what was supposed to be a couple of hours turned out to be a day for Cliff Gregory and myself, with Ranj & his team lending a hand as well!! Can't recommend them highly enough, I know that's a useless contact for anyone outside the UK but the same principles apply; Enthusiastic craftsman, utilising all his skills and enjoying doing a job away from the day to day routine.
When I get a moment I will put together a list of the people I have used, which will mainly be of use to the UK members, but in a nutshell all the suppliers, both big or the 'one man bands', I used in the US were superb. The one and only disappointment was an instrument service company that 'repaired' my Stork oil temp gauge, and it wasn't Nrth Hollywood or Palo Alto who were great.
I can't find an upholsterer who will come to me to install the head lining, any UK members know of anyone?, so I am going to have a dry run at installing the head lining following Steve Harrison's method and see if I have any hope of doing this myself. When I took it out I marked the position of the tensioning hoops with, what I thought were deep enough marks to show through the paint, but with the cleaning and painting there is absolutely no sign of them! Does anyone have measurements where these 3 tensioning hoops go? I'd say that there was a bit of variation simply due to how they work but it would be great if I could have an idea of where they should be as opposed to total guess work.
Thanks in advance,
V
Paint finished, reassembly begins and question re headliner
-
Vincent Gillespie
- 356 Fan
- Posts: 440
- Joined: Sun Jul 18, 2010 8:33 am
- Location: United Kingdom
-
Ashley James
- 356 Fan
- Posts: 449
- Joined: Sat Jun 04, 2016 2:38 pm
- Location: Near Stroud, Gloucestershire, UK
- Contact:
Re: Paint finished, reassembly begins and question re headli
Doesn't sound as though you're too far from my son's business www.richardjamesupholstery.com
He did the inside of mine
He did the inside of mine
-
Craig Richter

- 356 Fan
- Posts: 1305
- Joined: Thu Dec 15, 2011 9:01 pm
- Location: San Miguel de Allende/Traunkirchen
-
Scott Halperin
- 356 Fan
- Posts: 80
- Joined: Sat Nov 19, 2016 11:06 pm
Re: Paint finished, reassembly begins and question re headli
Vincent,
Not sure if your year is the same as my 64SC, but the slots for the ends were fairly obvious. I inherited this project as an empty shell post paint so it has been a learning process all the way. I had never done a headliner before, but I just took my time and went slowly.
The keys from my experience were;
a) buy a really good pair of scissors,
b) iron out the headliner before trying to install to get rid of all the creases,
c) mark the headliner from and back in the center,
d) mark the front are rear window frame in the center.
When I started with the bows I was very concerned that they should be free from bends and spend a lot of time straightening the old ones. Now looking back it did not seem to be that critical. When I tightened the headliner front and back the bows just naturally found their spots based on where they were sewn into the headliner.
After that I just started in the front center and then back center. Then worked out to the sides. I used a brush for the contact cement so I let them cure before install and then moved to the next section. Then moved to the sides and then middle out. I avoided big cuts till I was sure it was right. I had to remove a couple sections once or twice, but the contact cement was forgiving.
In the end I was really happy with how it turned out. After all this is why I am doing the project so I can learn, have fun and pride in the end product. I figured with the price of installation I could screw up 4 or 5 times and still save money.
Hope this helps.
- Attachments
-
-
Vincent Gillespie
- 356 Fan
- Posts: 440
- Joined: Sun Jul 18, 2010 8:33 am
- Location: United Kingdom
Re: Paint finished, reassembly begins and question re headli
Thanks, great tips and contacts, I should have said it's a 1955 bent screen.
V.
PS Climbing in & out and rolling around the floor doesn't get any easier, forget my Kingdom for a horse, I'd settle for a hoist!
V.
PS Climbing in & out and rolling around the floor doesn't get any easier, forget my Kingdom for a horse, I'd settle for a hoist!
V. Gillespie
-
Martin Benade

- 356 Fan
- Posts: 12348
- Joined: Wed Nov 23, 2011 10:52 am
- Location: Cleveland, Ohio
Re: Paint finished, reassembly begins and question re headli
I have seen a couple of headliners in progress by Mike Immarino who does beautiful work and saw one excellent idea of his. He gets it mocked up with probably 75 cheap plastic spring clips around the edges. It sits for several weeks relaxing into shape, and he continually retensions the clamped edges until all the wrinkles are gone, and then begins gluing. This is good because anything you do at one spot affects other areas. There might be much faster ways if you do several per week, but that stopped in the sixties.
Cleveland Ohio
62 Cabriolet
56 VW
02 IS 300
04 Sienna
62 Cabriolet
56 VW
02 IS 300
04 Sienna