Door sill deco strip and metal thickness

356 Porsche-related discussions and questions.
Message
Author
User avatar
Sean M Rooks
356 Fan
Posts: 492
Joined: Sun Aug 24, 2014 8:00 pm
Tag: '64 C Coupe
Location: Richmond, VA

Door sill deco strip and metal thickness

#1 Post by Sean M Rooks »

Hi folks. Looking for some advice on an issue that's cropped up in some winter maintenance/project work.

I found my problem while replacing the door seals in my 356C coupe. The originals were in fine shape, but the doors never closed right and the driver's side seal didn't seal out the wind. The installer used silicone to attach the old seals, leading to untold hours of scraping and goo removal. I'm sure the 1/2 inch of sealant in the channels was a factor in my issues. New double-bubbles from IM have been cut, fit, and tested and work well.

Anyway, I noticed that threshold seal area didn't look right. (no pics, sorry) There was an extra piece of thin weatherstripping glued underneath the aluminum trim rail on the sill (the piece that holds the carpet down). I pulled everything apart on both sides and the carpet wasn't trimmed correctly (it ran flush to the edge).

I've peeled the carpet back to trim it. The passenger side will go back together per the diagram in the Restorer's Guide to Authenticity. The driver's side looks off. Like there are too many layers of metal. Here's a couple of photos:

Image

Image

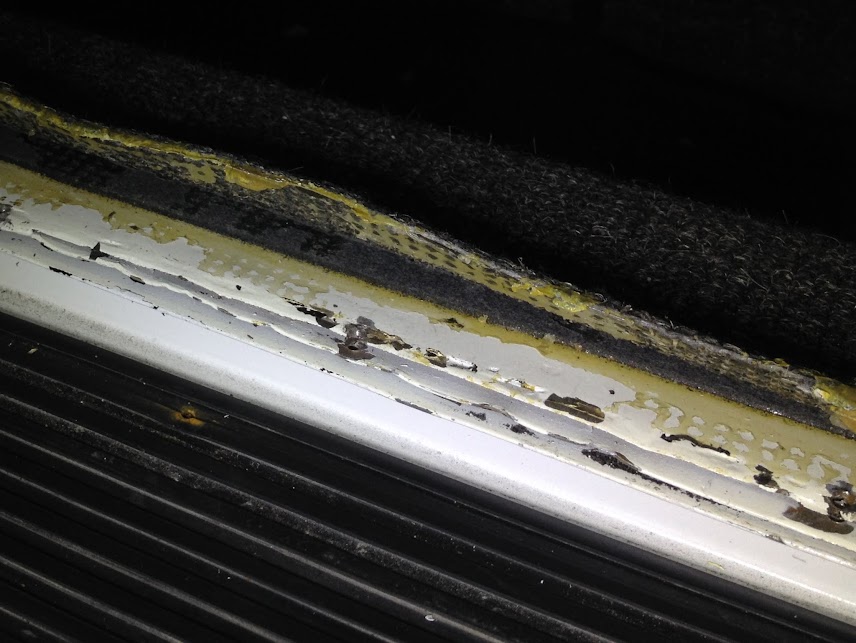
The original owner told me the outer longitudinal on the driver's side had been replaced at one point so I assume that's why there are so many layers here. There is a lot of space between each. If you try to install the trim rail, the outer edge doesn't "cup" the metal layers here the way it should. It's too thick. Also the turkey restorer smeared black silicone all over the edges I guess as a rust prevention technique. I've managed to remove most of that.

Any suggestions on how to deal with this? My initial thought was to try and squeeze the layers together at the edge enough to compress them to allow the trim rail to slide over. The other option I thought of was the grind back the bottom layer but that seems aggressive.

User avatar
Martin Benade
356 Fan
Posts: 12392
Joined: Wed Nov 23, 2011 10:52 am
Location: Cleveland, Ohio

Re: Door sill deco strip and metal thickness

#2 Post by Martin Benade »

You can probably open up the curl of the strip (the aluminum trim) a bit by tapping with a small hardwood block from end to end. If you grind back the bottom layer you may also remove the welds, it is hard to say if it was welded more than just the edge. Trimming back the carpet as much as possible will also help, I think that was already part of your plan.
Last edited by Martin Benade on Mon Feb 08, 2016 8:22 am, edited 1 time in total.
Cleveland Ohio
62 Cabriolet
56 VW
02 IS 300
04 Sienna

User avatar
Jim Karaba
356 Fan
Posts: 1027
Joined: Sun Feb 22, 2009 12:34 am
Location: Lafayette, LA

Re: Door sill deco strip and metal thickness

#3 Post by Jim Karaba »

There should be three layers of metal total along the door opening edge. I would hammer/dolley them back tight together like they should be.

User avatar
Sean M Rooks
356 Fan
Posts: 492
Joined: Sun Aug 24, 2014 8:00 pm
Tag: '64 C Coupe
Location: Richmond, VA

Re: Door sill deco strip and metal thickness

#4 Post by Sean M Rooks »

Thanks for the tips, gents. I'm very optimistic that I can fix this up by pressing those metal edges together using a hammer or dolly. And if needed, adjust the curled edge on the trim rail.

If anyone has suggestions on a tool that would make the dolly/hammer job easier and deliver a good result I'm all ears!

User avatar
Martin Benade
356 Fan
Posts: 12392
Joined: Wed Nov 23, 2011 10:52 am
Location: Cleveland, Ohio

Re: Door sill deco strip and metal thickness

#5 Post by Martin Benade »

A piece of wood about 2" x 1/2" x 6" would be good for light hammering on, with the _J_ shape held like the letter, on a non-scratchy surface like cardboard or wood. Hammer lightly on the wood (held vertically) working from one end to the other on the strip. This was much harder to put into words than I thought it would be. I hope it makes sense.
Cleveland Ohio
62 Cabriolet
56 VW
02 IS 300
04 Sienna

User avatar
Sean M Rooks
356 Fan
Posts: 492
Joined: Sun Aug 24, 2014 8:00 pm
Tag: '64 C Coupe
Location: Richmond, VA

Re: Door sill deco strip and metal thickness

#6 Post by Sean M Rooks »

Martin - after some processing I think I read you (I'm not a panel beater so this is new to me). By the J shape do you mean one of these:

Image

WilliamVaughan
356 Fan
Posts: 446
Joined: Fri Dec 03, 2010 7:42 am

Re: Door sill deco strip and metal thickness

#7 Post by WilliamVaughan »

try a big C-clamp, they are quiet, apply a lot of force, and they are easily controlled

User avatar
Martin Benade
356 Fan
Posts: 12392
Joined: Wed Nov 23, 2011 10:52 am
Location: Cleveland, Ohio

Re: Door sill deco strip and metal thickness

#8 Post by Martin Benade »

By the j shape I mean the cross section of the aluminum trim strip. Later I can post a sketch if you want.
Cleveland Ohio
62 Cabriolet
56 VW
02 IS 300
04 Sienna

User avatar
Sean M Rooks
356 Fan
Posts: 492
Joined: Sun Aug 24, 2014 8:00 pm
Tag: '64 C Coupe
Location: Richmond, VA

Re: Door sill deco strip and metal thickness

#9 Post by Sean M Rooks »

Ah, Martin you were referring to the trim strip and not the sill itself per your advice above at opening it up. That makes total sense. Thanks for clarifying.

Robert: I was thinking about something similar as an option. Large c clamp, maybe a few long strips of hardwood top and bottom, and squeeze until pressed together. Worth a shot.

User avatar
Doug McDonnell
356 Fan
Posts: 6084
Joined: Sat Apr 05, 2008 8:21 am
Location: Augusta,Michigan

Re: Door sill deco strip and metal thickness

#10 Post by Doug McDonnell »

Although I doubt that you can alter it,make sure the space for the threshold seal metal mounting strip remains intact with enough room. And what should the spaces between the 3 metal layers be treated with to inhibit rust formation? I would assume the spaces should be treated with something before being closed up as much as possible?
1965 356C 2000 BMW 740i Sport 1967 Honda CL77 There is never enough time to do it right, but always enough time to do it over.

User avatar
Sean M Rooks
356 Fan
Posts: 492
Joined: Sun Aug 24, 2014 8:00 pm
Tag: '64 C Coupe
Location: Richmond, VA

Re: Door sill deco strip and metal thickness

#11 Post by Sean M Rooks »

Doug, good tips.

Quick progress report: Had some time this afternoon (after driving to MD to pick up a pair of used factory seats for my car) to spend on the door sill.

I cleaned out the remainder of the silicone that would get in the way of pressing the layers together and also any visible rust using a wire wheel. I applied primer to the entire area in preparation for the big squeeze, which I will attempt tomorrow.

Image

Image

Note the paint is well into the gaps.

User avatar
Steve Harrison
356 Fan
Posts: 3301
Joined: Sat Jan 24, 2009 11:39 am
Location: Auburn AL

Re: Door sill deco strip and metal thickness

#12 Post by Steve Harrison »

You may find that the metal springs back a fair bit after each tap. Also, looks like the longitudinal replacer sort of "edge" welded the three layers together. Those lumps will tend to keep the three layers separated. You may have to use a thin "ziz" wheel (think really thin grinder wheel) to clean out the weld lumps between the layers. Then you can squeeze shut and weld again. Or,...I've never tried it, but they say the expoxies available today are really really stout....

User avatar
Steve Harrison
356 Fan
Posts: 3301
Joined: Sat Jan 24, 2009 11:39 am
Location: Auburn AL

Re: Door sill deco strip and metal thickness

#13 Post by Steve Harrison »

Or, if you're not a welder, you could get it all cleaned up, shielded off, and then take it to a welder and he'd make short work of pinning those layers together. Then you can get it back to your shop and dress the welds with a grinder, paint, etc on your own time. The actual welder bill would be pretty small because he'd only have the actual welding to do. Just make sure to tell him clearly that you want the layers clamped together tightly first. He'd probably assume that, but you never know...

User avatar
Sean M Rooks
356 Fan
Posts: 492
Joined: Sun Aug 24, 2014 8:00 pm
Tag: '64 C Coupe
Location: Richmond, VA

Re: Door sill deco strip and metal thickness

#14 Post by Sean M Rooks »

Hi Steve!

Thanks for the tips. You were right on the "springy" nature of the metal. To the point where the clamps and two pieces of wood method didn't work at all. The metal just sprung back into original position after removing the clamps.

I had to use pretty much every suggestion above to get the job done.

I bought a hammer and dolly set and went to town on the layers from front to back, hammering from the top and applying pressure from the dolly up underneath. I didn't get everything perfectly flat together (probably due to the welded bits you mentioned) but definitely much improved and tightened up.

Next, I found that the trim strip had to be opened up at the curve at the front per Martin's advice above to cover the layers of metal. I still found the holes didn't line up at the side near the door post but from 2/3 back from the front things were gold. I discovered that because the original restorer just set the trim strip on top of the sill and drilled holes that I needed to grind some metal away in the center and near the door post to line things up from front to back.

After a little more tweaking of the sill trim and some more touch up hammer and dolly work, I got it to fit! At least as well as the passenger side which goes on OK.

After I was done I filed, sanded, and primed again to protect everything and fix up the hammer marks. Things look pretty good now.

Next time I have some warm weather I'll work on trimming up the carpet, polishing up the sills, and installing. I need to buy a new u-channel though. I horribly bent the pass. side one getting it out.

Many thanks to the group for the advice! It took two solid afternoons to get this done but darnit I couldn't live with it not being right!!

Jim Hohensee
356 Fan
Posts: 150
Joined: Sat Dec 04, 2010 10:50 pm
Location: Buffalo, NY

Re: Door sill deco strip and metal thickness

#15 Post by Jim Hohensee »

Sean, I would do like the guys are saying and clean out those ugly welds some and make sure all the silicon is gone. Then work some JB weld or 3m panel bonding adhesive into all the layers. Purchase or borrow as many flat nose vice grips as possible and clamp the layers together for a couple of days. That should be strong and water tight. Each vice grip has a 3" wide clamping area that will fit into narrow areas.

Good Luck,
Jim

Post Reply